Friday, June 03, 2011

How to install and configure Microsoft Dynamics Ax 2009 workflow step by step


This article explains:
How to install Microsoft Dynamics AX 2009 Workflow step by step
How to configure Microsoft Dynamics AX 2009 Workflow step by step
How to setup Microsoft Dynamics AX 2009 Workflow step by step
About Workflow:
The Microsoft Dynamics AX workflow infrastructure enables user configurable workflows in Microsoft Dynamics AX application modules with specific focus on task and approval workflows. The workflow runtime manages configuration and executation of workflows while the application modules will manage activation and business logic associated with workflows.Microsoft Dynamics AX 2009 workflow uses Windows Workflow Foundation (.Net framework), AX batch framework, Internet Information Services (IIS), Active Directory (AD) users, .Net Business Connector for AX and web services.
Prerequisite:
You should have basic knowledge of AX.Basic AX should be installed on your system.Create two users in AD. One is for workflow another is for business connector proxy. The password should not be expired or changed for these users.If you have already created, no need to create now.Add these users to AX.
Steps to follow:
1) Open AX client then open the System service accounts form and add users for workflow.Go to Administrator > Setup > Security > System service accounts.
2) If you want to use a separate website for workflow then create a website in IIS or you can use the default website. If you use default website the setup process will create a sub site under default website.


I have created a new website called AxWfl as shown above. It’s not mandatory to create a separate website for this but recommended.

3) Run AX setup file and install workflow. If .Net Business Connector is not installed AX setup will install it itself.

4) Once the setup process is done successfully open AX client.

5) From Basic main menu create a Calendar. Here I have created the calendar called 24Hours.

6) Create a batch job for workflow. Go to the Basic > Batch job list – user form and create a batch job. Here I have created a job called Wfl.
7) Go the Administration > Setup > Workflow infrastructure configuration wizard form.Run the wizard and follow the instructions and finish it.

8) Now make a setup for Purchase Requisition. Go to Accounts Payable > Setup > Workflow configurations form. Here configure the workflow with required conditions. A Workflow Configuration is bound to a single Workflow Template. In this process you need to select the calendar you created in step 5.

Once the purchase requisition workflow setup is over go to AOT > Forms > PurchReqTable > Designs > Design. Right click on Design then properties and check whether is Workflow Enabled or not.

9) Once you have done all these then create purchase requisition using respective user, perform all the tasks you instructed during workflow configuration/setup and submit it. After submission you can see the history of workflow.


10) Now open AX client using approver user id and see the task assigned and complete it.

Using approver user id approve it and check that the purchase order has been created or not. I hope it will create a purchase order.

How to resolve SysWorkflowMessageQueueManager-run error in Microsoft Dynamics Ax 2009 Workflow


This article explains how to resolve SysWorkflowMessageQueueManager-run error in Microsoft Dynamics Ax 2009 Workflow.

Error:
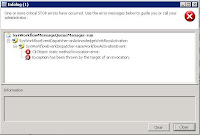
ClrObject static method invocation error.
Exception has been thrown by the target of an invocation.
Applied on:
Ax 2009 SP1
The workaround- the above mentioned error there are few things to be checked.
1) Make sure the .NET Business Connector is connected to the correct AOS server or not.
To check this:
  • a) Start --> Administration tool --> Microsoft Dynamics AX 2009 Configuration.
  • b) On the tob change Configuration Traget to: Business Connector (non-interactive use only) on Connection tab check that it is connecting to correct AOS or not. It should be connected.
2) If you shutdown the AOS then you may need to restart the IIS to refresh the connection.
To restart it:
  • i) Start --> Run
  • ii) Type "IISRESET" without quote
  • iii) Click on OK buttonORa) Open command promptb) Type in "IISRESET" without the quote.
3) If you have more than one Workflow website setup for several environment on the same system then except one you are testing stop other websites.
4) Compare the Identity of the Application Pool used by Ax Workflow website with the Business Connector proxy setup in the system. If business connector proxy user id is not configured properly with Applicatoin pool the .NET Business Connector will fail to connect to the AOS.

How to resolve Stopped (error): Target date not found in work calendar error in Microsoft Dynamics Ax 2009 Workflow


This article explains how to resolve Stopped (error): Target date not found in work calendar error in Microsoft Dynamics Ax 2009 Workflow.

Symptom:
If you see the Tracking details of your workflow process it shows "Workflow stopped (error)" and : Stopped (error): Target date not found in work calendar.

Reason:
A work calendar is missing in workflow setup.

Resolution:
The workaround on this, create a work calendar in Ax.
To do this:
Go to Basic-->Calender and create a calender. If you have already created a calender you can use that one.

Once the Calender is created, assign the calendar to the workflow setup. Lets say you are running workflow for Purchase Requisition then Go to the Accounts Payble-->Setup-->Workflow Configuration. On this form go to Details tab, select a Workflow element, in the buttom part (Approval Details) select Overview tab, check the check box "Set a time limit for the approval process". Here you will get the calender lookup to select a work calender. Assign a calender and do any other setup if you require. Save your work and make transaction for workflow to check.

I hope this will remove your 
Stopped (error): Target date not found in work calendar error.

How to resolve Ax 2009 SRS reports deployment error or exception

This article explains how to remove 
  • While deploying AX SRS reports from AX client (AOT->Report Libraries), system gives below error / exception
  • While deploying AX Reports Deployment tools , system gives below error / exception
Symptom:
In case of SQL Server 2008
One or more libraries built with warnings. Please see MSBuild log at C:\Documents and Settings\Administrator\Local Settings\Temp\tmp.tmp
Deploying 0 data source(s) and 63 design(s) in 42 culture(s) (2521 item(s) total)...
Unable to connect to http : // [your system name]/ReportServer/ReportService2005.asmx as specified in the config file for the report server at C:\Program Files\Microsoft SQL Server\MSRS10.MSSQLSERVER\Reporting Services\ReportServer\RSReportServer.config. If this url is not correct please update the config file, otherwise make sure the report server is configured correctly. The deployment log file can be found at "C:\Users\Administrator\AppData\Local\Temp\1\tmp.txt"


In case of SQL Server 2005
One or more libraries built with warnings. Please see MSBuild log at C:\Documents and Settings\Administrator\Local Settings\Temp\tmp.tmp
Deploying 0 data source(s) and 63 design(s) in 42 culture(s) (2521 item(s) total)...
Unable to connect to http : // [your system name]/ReportServer/ReportService2005.asmx as specified in the 
config file for the report server at C:\Program Files\Microsoft SQL Server\ MSSQL.3\Reporting Services\ReportServer\RSReportServer.config. If this url is not correct please update the config file, otherwise make sure the report server is configured correctly.
The deployment log file can be found at "C:\Users\Administrator\AppData\Local\Temp\1\tmp.txt"


Resolution:
Check following:
1) Is your report manager working from IIS or Internet explorer? If no then make it workable. If it works then you can see Report Manager Home.
2) Is web service http : // [your system name]/ReportServer/ReportService2005.asmx working?

To make the default Report Manager workable, you can see the installation and configuration guidance.

If you are using SQL server 2008, open the C:\Program Files\Microsoft SQL Server\MSRS10.MSSQLSERVER\Reporting Services\ReportServer\RSReportServer.config file in an editor (Notepad is perfect).

If you are using SQL server 2005, open the C:\Program Files\Microsoft SQL Server\MSSQL.3\Reporting Services\ReportServer\ rsreportserver.config file in an editor (Notepad is perfect).

Now you have to modify this config file. Before you do this I do recommend you to make a copy of this file as a backup.Press Ctrl + F and find ‘SQLCommandTimeoutSeconds’. By default the value is 60. Increate the value upto 300 and save the file.

Now restart the IIS.
Launch AX SRS report deployment tool. I hope it will work.

Once the AX SRS Reports deployment is finished go back to the above mentioned config file and decrease the value 60 from 300. 

Cheers!

Resolution for Microsoft Dynamics Ax 2009 Role Center & Enterprise Portal (EP) Access Denied error

This article explains:
How to resolve Microsoft Dynamics Ax 2009 Role Center & Enterprise Portal (EP) Access Denied error.
How to assign permission to Microsoft Dynamics Ax 2009 Role Center & Enterprise Portal (EP) users.
How to give permission for Microsoft Dynamics Ax 2009 Role Center & Enterprise Portal (EP) users from Microsoft Windows Sharepoint Services or Server.


Problem:
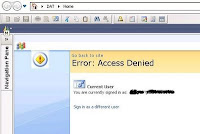
When you open Microsoft Dynamics Ax 2009, the role center shows an error “Error: Access Denied” + “Current User” + “You are currently signed in as: domain name\user id” + “Sign in as a different user”.

Reason:
You don’t have the permission to access AX enterprise portal (website) which is made within windows sharepoint services or server.

Resolution:
The permission to be given to all the users who wants to access Role Center or Enterprise portal.

1) 
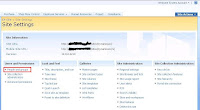
To give the permission you have to login to the Ax enterprise portal (website) using administrator permission.On the Ax enterprise portal site there would be a button called “Site Actions” on upper right hand side. Click on Site Actions then Site Settings as shown below.


2)
Click on People and groups under Users and Permissions


3)
Click on New then Add Users.


4)
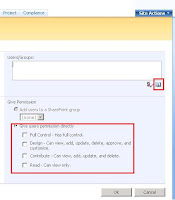
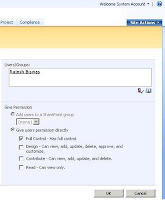
Add user(s) from domain you are using for AX and WSS. Once the user(s) is added, give permission accordingly as shown below.


5)
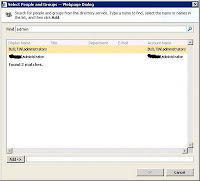
From below screen you can search user(s) and add them.


6)
Once the user(s) added and permission assigned, click on OK button.
Now you have given the permission to the user(s). It should not give you any error like Access Denied.

How to write data into an Excel sheet from Microsoft Dynamics Ax


This article explains
  • How to write data into an Excel sheet from Microsoft Dynamics Ax using X++ language.
  • How to write data into an Excel sheet using COM object in Microsoft Dynamics Ax.
  • How to export Microsoft Dynamics Ax data into an Excel sheet at run time / dynamically /programmatically using X++ language.
I applied it on Dynamics Ax 2009. 

Prerequisite: 
  • You should have X++ basic programming knowledge;
Open Ax client > AOT > Jobs node, create a new job and copy the below code segment into your job.

static void writeDataIntoExcelSheetFromAx(Args _args)
{
InventTable inventTable;
Container itemIdCon;
COM comRange;
COM comWorkBook;

COM comWorkBooks;
COM comWorkSheet;
COM comCharacters;
COM comAppl;
str test,test1;
int offset = 65-1; //65 means letter 'A'
str 2 columnId;
str fileName;
str time;
int i;
#define.Excel('Excel.Application')

;

comAppl = new COM(#Excel);
comAppl.visible(true);
comWorkbooks = comAppl.workbooks();
WINAPI::createFile('C:\\test.xls');
comWorkbook = comWorkbooks.open('C:\\test.xls',true,true);
comWorksheet = comWorksheet.new('C:\\test.xls');
comWorksheet = comWorkbook.activeSheet(); //Use 
comWorkbook.activateSheet(); in case of Ax 3.0
comWorksheet.select();

while select inventTable
{
columnId = num2char(offset + 1);
i++;
test = columnId + int2str(i);
comRange = comWorksheet.range(test);
comCharacters = comRange.characters();
comCharacters.insert(inventTable.ItemId);

columnId = num2char(offset + 2);
test = columnId + int2str(i);
comRange = comWorksheet.range(test);

comCharacters = comRange.characters();
comCharacters.insert(inventTable.ItemName);
}

WINAPI::createDirectory('C:\\AxData');
time = time2str(timenow(),1,1);
time = strrem(time,':');
fileName = 'C:\\AxData\\' + curuserid() + date2str(today(),123,2,0,3,0,4)+ time + 'test' + '.xls';
comWorkbook.saveAs(fileName);

}

How to use .Net Business Connector for Dynamics Ax 4.0 within .Net

Requirement :
1) Ax 4.0 with .Net Business Connector
2) Visual Studio 2005 (preferred)

Business Connector enables third-party applications to interface with Microsoft Dynamics AX as though they were a native Microsoft Dynamics AX client. Applications built using the Microsoft .NET Framework or ASP.NET can now interface with Microsoft Dynamics AX using the .NET Business Connector. The .NET Business Connector is integrated with Enterprise Portal and Web services. You can leverage the benefits of these other applications and services by installing the .NET Business Connector.


Open your visual studio.
Click on File>New>Project. New Project window will open. Select Visual C# from Project types and Windows Application from Templates. Give a name in the Name field and click on OK button.


By default Form1 will be added to your project.
From Toolbox add a button and a textbox to the form as shown below:


Double click on the button.
Now see the default code below:

using System;
using System.Collections.Generic;
using System.ComponentModel;
using System.Data;
using System.Drawing;
using System.Text;
using System.Windows.Forms;

namespace DotNet2Ax //your project name
{
public partial class Form1 : Form
{
public Form1()
{
InitializeComponent();
}

private void button1_Click(object sender, EventArgs e)
{

}
}
}

Click on menu Project >Add Reference…
It will give you the dialog as below:


Click on Browse tab and browse the Ax 4.0 Client folder then Bin and locate Microsoft.Dynamics.BusinessConnectorNet.dll as shown below:


Click OK button.

Now add the below lines in the button1_Click method.

Microsoft.Dynamics.BusinessConnectorNet.Axapta DAX = new Microsoft.Dynamics.BusinessConnectorNet.Axapta();
Microsoft.Dynamics.BusinessConnectorNet.AxaptaRecord DAXRec;
DAX.Logon(null, null, null, null);
DAXRec = DAX.CreateAxaptaRecord("CustTable");
DAXRec.ExecuteStmt("select firstonly * from %1");
textBox1.Text = (string) DAXRec.get_Field("name");

After adding the lines it will look like:
private void button1_Click(object sender, EventArgs e)
{
Microsoft.Dynamics.BusinessConnectorNet.Axapta DAX = new Microsoft.Dynamics.BusinessConnectorNet.Axapta();
Microsoft.Dynamics.BusinessConnectorNet.AxaptaRecord DAXRec;
DAX.Logon(null, null, null, null);
DAXRec = DAX.CreateAxaptaRecord("CustTable");
DAXRec.ExecuteStmt("select firstonly * from %1");
textBox1.Text = (string)DAXRec.get_Field("name");

}

Now click on Build>Build Solution.
Click on Debug>Start Debugging. Your Form1 will run. Click on the button and see the value of CustTable field ‘Name’.


Code Description:
DAX.Logon(null, null, null, null);
The above method takes logon criteriaon/parameters
Company, Language, ObjectServer, Configuration all are in string

DAXRec = DAX.CreateAxaptaRecord("CustTable");
In the above line table name has been specified.

DAXRec.ExecuteStmt("select firstonly * from %1");
In the above line select statement has been specified.

textBox1.Text = (string)DAXRec.get_Field("name");
In the above line selected record of field name is being assigned to the textBox control.

How to use CLR Interop with Dynamics Ax 4.0

This article will explain you how to use CLR Interop with Dynamics Ax 4.0.

Write your business logic in .Net environment and use that within Dynamics Ax.

It assume that you are familiar with Microsoft Dynamics Ax and Visual Studio .Net
You should have Ax 4.0 & Visual Studio .Net installed on your system.
There is No warranty on this article, use at your own risk. If it’s useful then refer to others.

.NET CLR Interop Overview
Classes in assemblies that are managed by the common language runtime (CLR) can be accessed in X++ code. This feature of Microsoft Dynamics AX is called common language runtime (CLR) interoperability, or CLR interop.
The CLR interop feature works only in the direction from X++ calling into CLR managed assemblies. It does not support calling X++ classes from a CLR managed assembly.
CLR interop is useful when you want your X++ code to access the functionalities in a CLR managed assembly.


1.
Open Visual Studio and create a new project. During creating a new project area, choose programming language Visual C# and template Class library. I have given the project name TalkToDotNet.


Figure 1.


Figure 2.

2.
By default you will get a standard class template as below:
using System;
using System.Collections.Generic;
using System.Text;

namespace TalkToDotNet
{
public class Class1
{
}
}


3.
Now add the following lines within Class1
public string CombinedMsg(string _msg)
{
string message1;
message1 = _msg;
return message1 + "From .Net: I am fine";
}

After addition the above lines the class1 will look like:

using System;
using System.Collections.Generic;
using System.Text;

namespace TalkToDotNet
{
public class Class1
{
public string CombinedMsg(string _msg)
{
string message1;
message1 = _msg;
return message1 + "From .Net: I am fine";
}
}


}


The above class is having a method called CombinedMsg which takes a string parameter and add "From .Net: I am fine" string with the parameter string.

4.
Now go to the project explorer window and select the project. Right click on the project and click on Properties. You will get the window as below.


Figure 3.

5.
Click on Signing Tab and then check the check box Sign the assembly.


Figure 4.
6. Choose New from the drop down box as shown below.


Figure 5.

7.
It will ask you for user id and password to protect your business logic. This is optional. You may ignore.

Figure 6.


8.
Click on Build menu then Build Solution.

Figure 7.
If any error is there then you will be prompted otherwise you will get the successful message. Now copy the dll from your project area and paste it to Bin directory of your Ax client folder.


9.
Now open your Ax application.


10.
Open AOT, select the References node and right click on it. On the context menu click on Add reference.

Figure 8.


11.
You will get the window as below. Click on Browse button and go to the Bin folder of your Ax client folder.

Figure 9.


Figure 10.


Figure 11.


12.
See the dll is added.

Figure 12.

13.
The dll is now added in the references node of AOT.


Figure 13.


14.
Now create a job in Ax and call the dll.

Figure 14.


Figure 15.


15.
The job is as below.

Figure 16.


static void TalkToDotNet(Args _args)
{
str strval;
TalkToDotNet.Class1 testCls = new TalkToDotNet.Class1();
strval = testCls.CombinedMsg('From Ax: How are you? ');
print strval;
pause;
}

16.
See the print message below. It takes a string message from Ax and adds it with the message returned by dll.

Figure 17.

Hope it would a helpful article for you guys.

How to write a web lookup method in X++ (Dynamics Ax)

This article is for those who has basic knowledge of Dynamics Ax (Axapta).
To write this method I used Ax 3.0

Prerequisite: You should have Ax 3.0 Enterprise Portal (EP) installed and license for EP development.

1. Open your Ax application then AOT.

2. Create a new table and rename it as you wish (I used a name "WebLookUpTable") and add three fields to it as shown below:


3. Now go to Methods node of the table you just created and add a new method.

4. Rename the method "webLookUpTableTest" or as you wish. Your method now is a void type. Add "client static" before void key work.

5. Now add the following lines to your method.

client static void webLookUpTableTest()

webTableLookup webTableLookup;
Query query; 
QueryBuildDataSource queryBuildDataSource;
;

webTableLookup = webTableLookup::newParameters(tableNum(WebLookUpTable));
webTableLookup.addLookupfield(fieldNum(WebLookUpTable, ProfileId),true);
webTableLookup.addLookupfield(fieldNum(WebLookUpTable, Name));
webTableLookup.addLookupfield(fieldNum(WebLookUpTable, Phone));
query = new Query();

queryBuildDataSource = query.addDataSource(tableNum(WebLookUpTable));

webTableLookup.parmQuery(query);
webTableLookup.run();

}

5. Browse your newly created table and create some data in the table.

6. Now your table and web lookup method is ready. You can use it on your existing web form or create a new web form to test it. I used a new web form.

7. To create a new web form go to Web node of AOT then Web Forms. Right click on Web Forms node, on context menu click on New Web Form. Give a name to this form if you wish. Add a WebEdit control to the web form. Go to the Methods node of the WebEdit control and select then right click on it and select Override Methods then "lookup" method.

8. Double click on the lookup method and add "WebLookUpTable::webLookUpTableTest();" after super().

Your web form will look like:


9. Right click on the WebEdit control and click on Properties. Set "Custom" for LookupMethod property.

10. Create a menu item for this web form and add it to a web menus wherever you want. I added it to EPSalesHome->Common tasks->Lookup test.


11. Save your entire customization and run your EP. Browse the web form you added and see the control on that form. A lookup button will be available on this control.


[control on web form]


[Lookup form]


In the above lookup method, you are using "webTableLookup" class to crate lookup. The Query and QueryBuildDataSource have been used to set data data source to web lookup form.
webTableLookup.addLookupfield(fieldNum(WebLookUpTable, ProfileId),true);
In the above line true has been passed because of return value. It means the selected ProfileId to be returned to the WebEdit control.

Use Chain Of Command with Examples

 Dear Friends Here is an example of using Chain of Command for form datasource methods. [ExtensionOf(formDataSourceStr(<<Form Name>...