Friday, October 07, 2011

Batch Task Dependency in Dynamics AX 2009


Hello Friends,

Scenario : 
You want to schedule 2-3 tasks,  but you would like to define dependency among tasks.
Means Task1 should be executed only after completion of Task 3 and Task 2.


Advantage :
You all might have heard of "Divide and Conquer Rule", So this also implements the same.
Generally if you create batch to process 1000 Purchase orders then it might slow down the AOS performance and delay the overall batch performance.
But if you create batch and create 10 tasks, each process 100 Purchase orders then will be fast compared to above procedure and will improve overall batch performance.

How to :
In Dynamics AX 2009,  Batch process will make use of below tables
  •      BatchJob   : Main Job scheduler, consists of task
  •      BatchTask : Task in batch which specifies what class to execute in order to achieve    certain  functionality.
  •      BatchConstraint : Used to build dependencies among the tasks.

Create a Job, by using below code

static void Batch_CreateDependency(Args _args)
{
    BatchJob                batchJob;
    Batch                   batch;
    Tutorial_runBaseBatch   testDependency;
    BatchConstraints        batchConstraints;
    RefRecId                RecId_Task1, recId_task2, recId_task3;
    
    // Create task
    RefRecId createTask(str _msg)
    {
        ;
        batch.clear();
        batch.initValue();
        batch.GroupId           = '';
        batch.BatchJobId        = batchJob.RecId;
        batch.RunType           = BatchRunType::Server;
        batch.RetriesOnFailure  = 0;
        batch.AutomaticTransaction = NoYes::No;
        batch.Caption           = _msg;
        batch.Status            = BatchStatus::Waiting;
        batch.Company           = curext();
        testDependency          = Tutorial_runBaseBatch::construct();
        batch.ClassNumber       = classidget(testDependency);
        batch.insert();
        
        return batch.RecId;
    }
    
    // Building dependencies
    void buildDependency(RefRecId _batchId, RefRecid _dependendRecId)
    {
        ;
        batchConstraints.clear();
        batchConstraints.initValue();
        batchConstraints.BatchId = _batchId;
        batchConstraints.DependsOnBatchId = _dependendRecId;
        batchConstraints.ExpectedStatus = BatchDependencyStatus::FinishedOrError;
        batchConstraints.insert();
    }
    
    ;

    batchJob.clear();
    batchJob.initValue();
    batchJob.OrigStartDateTime = DateTimeUtil::newDateTime(systemDateGet(), DateTimeUtil::time(DateTimeUtil::utcNow()) + 10);
    batchJob.Status = BatchStatus::Waiting;
    batchJob.Caption = "Test Batch Dependency";
    batchJob.insert();

    recId_Task1 = createTask("Task 1");
    recId_Task2 = createTask("Task 2");
    recId_Task3 = createTask("Task 3");
    
    buildDependency(recId_Task1, recId_Task2);
    buildDependency(recId_Task1, recId_Task3);
    
    info(strfmt("The %1 Job scheduled to run 3 tasks", batchJob.Caption));
}

When you execute this Job, Go to Basic-->Inquiries-->Batch Job and you should see as below,

As per the snap, you can see Task 1 will be executed once Task 2 and Task 3 gets completed.

Enjoy Multi Threading  :)

Thursday, September 08, 2011

Connect to an External Database from X++ Code

Create a DSN


To create a Data Source Name (DSN) go to Administrative Tools > Data Sources (ODBC).

Create the DSN on the tier where the X++ code will call the DSN from. This will be either on the client computer or on the AOS computer.

X++ Code Example with ODBC


// X++ job
static void TestOdbcJob()
{
    LoginProperty loginProperty;
    OdbcConnection odbcConnection;
    Statement statement;
    ResultSet resultSet;
    str sql, criteria;
    SqlStatementExecutePermission perm;
    ;

    // Set the information on the ODBC.
    loginProperty = new LoginProperty();
    loginProperty.setDSN("dsnName");
    loginProperty.setDatabase("databaseName");

    //Create a connection to external database.
    odbcConnection = new OdbcConnection(loginProperty);

    if (odbcConnection)
    {
        sql = "SELECT * FROM MYTABLE WHERE FIELD = "
            + criteria
            + " ORDER BY FIELD1, FIELD2 ASC ;";

        //Assert permission for executing the sql string.
        perm = new SqlStatementExecutePermission(sql);
        perm.assert();

        //Prepare the sql statement.
        statement = odbcConnection.createStatement();
        resultSet = statement.executeQuery(sql);

        //Cause the sql statement to run,
        //then loop through each row in the result.
        while (resultSet.next())
        {
            //It is not possible to get field 3 and then 1.
            //Always get fields in numerical order, such as 1 then 2 the 3 etc.
            print resultSet.getString(1);
            print resultSet.getString(3);
        }

        //Close the connection.
        resultSet.close();
        statement.close();
    }
    else
    {
        error("Failed to log on to the database through ODBC.");
    }
}

Wednesday, September 07, 2011

Create a custom site theme for SharePoint and make it available to others


Here are the steps you can follow to create your own custom theme and make it available to others in your organization. For this example, I created a new theme called "My Custom Theme" based on the Classic theme in SharePoint.

1 - Identify a theme that closely resembles the theme you want to create

The first step is to first take a look at the existing themes available in SharePoint and determine if one of those themes closely resembles the theme that you want to create.
  1. Go to the SharePoint site where you want to create the theme (log on, if necessary).
  2. Click the Site Actions menu and choose Site Settings.
  3. Under Look and Feel, click Site theme.
  4. Look through the themes until you find one that closely resembles the theme you want to create. Note the name of the theme so you can find the files you need for later steps.
  5. For this example, I know that I want to use the Classic theme.
  6. Cancel out of the Site Theme page.
2- Create your custom theme folder
  1. Log onto the server that hosts your SharePoint site and browse to the following folder:
    C:\Program Files\Common Files\Microsoft Shared\web server extensions\12\TEMPLATE\THEMES
  2. Copy the folder that corresponds with our theme. In my case, I copied the Classic folder.
  3. Paste this into this same THEMES folder, so that you end up with a Copy of THEMENAME folder. In my case, I ended up with a Copy of CLASSIC folder.
  4. Rename this folder to MyCustomTheme.
3 - Modify the theme setup information file (INF)
  1. Open the MyCustomTheme folder and locate the name of the theme you chose as a starting point for your new theme. For example, CLASSIC.INF.
  2. Rename CLASSIC.INF (or the INF file for the theme you chose) to MYCUSTOMTHEME.INF (yes, please use upper case).
  3. Edit MYCUSTOMTHEME.INF in Notepad (or your preferred text editor).
  4. Perform a search and replace in this file, replacing every instance of Classic (or the theme you chose) withMyCustomTheme.
  5. Save and close MYCUSTOMTHEME.INF.
4 - Modify the SPTHEMES.XML file
  1. Browse to the following folder:
    C:\Program Files\Common Files\Microsoft Shared\web server extensions\12\TEMPLATE\LAYOUTS\1033
  2. Locate SPTHEMES.XML.
  3. Edit SPTHEMES.XML in Notepad (or your preferred text editor).
  4. Add the following text after the <SPThemes> tag so that it matches the other templates in this file:
    <Templates>
     <TemplateID>MyCustomTheme</TemplateID>
     <DisplayName>My Custom Theme</DisplayName>
     <Description>My Custom Theme.</Description>
     <Thumbnail>images/mycustomtheme.gif</Thumbnail>
     <Preview>images/mycustomtheme.gif</Preview>
    </Templates>
  5. Save and close SPTHEMES.XML.
  6. Reset the server so that your theme shows up on the Site Theme page in SharePoint. You can reset the server by entering the following text in the Start > RUN line:
    iisreset computer name
    (where computer name is the name of the server)
5 - Apply your custom theme to your site
  1. Return to your SharePoint site.
  2. Click the Site Actions menu and choose Site Settings.
  3. Under Look and Feel, click Site theme.
  4. In the list of themes, select My Custom Theme.
  5. Click Apply.
    Your site will look no different from the Classic theme since we based your custom theme on it. 

Tuesday, September 06, 2011

AX 2009 : Create and Post Inventory Journal


Following is job which will create and post the Inventory Journal in ax 2009 :-

static void createMovJournal(Args _args)
{ InventJournalTable journalTable;
InventJournalTrans journalTrans;
InventJournalTableData journalTableData;
InventJournalTransData journalTransData;
InventTable inventTable;
InventDim inventDim;
Counter cnt;
InventJournalCheckPost journalCheckPost = new InventJournalCheckPost();
DialogButton dbtn;
;

journalTableData = JournalTableData::newTable(journalTable);
journalTransData = journalTableData.journalStatic().newJournalTransData(journalTrans,journalTableData);

// Init JournalTable

journalTable.clear();

journalTable.JournalId = journalTableData.nextJournalId();
journalTable.JournalType = InventJournalType::Movement;
journalTable.JournalNameId = journalTableData.journalStatic().standardJournalNameId(journalTable.JournalType);

journalTableData.initFromJournalName(journalTableData.journalStatic().findJournalName(journalTable.JournalNameId));

// Init JournalTrans
select firstonly inventTable;
for(cnt=1;cnt<10;cnt++)
{
journalTrans.clear();
journalTransData.initFromJournalTable();

journalTrans.TransDate = systemdateget() + 1 div 2;
journalTrans.ItemId ='1103';    //inventTable.ItemId;
journalTrans.Qty = 100;
journalTrans.CostAmount = 100;
journalTrans.LedgerAccountIdOffset='110170';

// Dimension details

inventDim.InventLocationId = '11';
journalTrans.InventDimId ='00000061_069'; //InventDim::findOrCreate(inventDim).inventDimId;

journalTransData.create();


}

journalTable.insert();

// Call the static method to post the journal
if(InventJournalCheckPost::newPostJournal(journalTable).validate())

if(box::yesNo("Do you want to Post Now?",DialogButton::No)==DialogButton::Yes)
{
InventJournalCheckPost::newPostJournal(journalTable).run();
}
else
{
 box::info("Not Posted");
}
info("done");

}


Enjoy DAX.
Cheers !!@

Posting SalesOrder Confirmation with SalesFormLetter Class in Ax 2009

The Book of orders in Microsoft Dynamics AX is done through the class "sales form letter" or one of its more concrete (derived) classes.
Each reservation type (eg confirmation, delivery note, invoice) is represented by a class that is derived from the base class "sales form letter" (see illustration).
To reserve an order by code, an object of class "sales form letter" can be created.
salesFormLetter = SalesFormLetter::construct(DocumentStatus::Confirmation);
This is done as common practice in Microsoft Dynamics AX, on the "construct" method of the class. must be specified as parameters to this method the desired type of booking (eg confirmation, delivery note, invoice).
The "construct" a method generates the appropriate transaction type, object and returns that (in this case, a "SalesFormLetter_Confirm" object created).
The actual book is called the method "update". Since this method can all be submitted for the booking necessary data as parameters, is a single assignment of such a mandate which is to be posted not necessary.
For example:
// — — Book without print 
static void PostingConfimation(Args _args) 

SalesFormLetter salesFormLetter; 
SalesTable salesTable; 
SalesId salesId; 
PrintJobSettings printJobSettings; 

//Angabe des Auftrags, welcher gebucht werden soll. 
salesId = "00423_036"; 
salesTable = SalesTable::find(salesId); 
// Bestimmen des Buchungstyps durch Angabe des DocumentStatus 
salesFormLetter = SalesFormLetter::construct(DocumentStatus::Confirmation); 
//Buchen des Auftrags (aber nicht Drucken). 
salesFormLetter.update(salesTable, 
SystemDateGet(), 
SalesUpdate::All, 
AccountOrder::None, 
NoYes::No, 
NoYes::No); 
}

This example is good to see that necessary for the posting of a job essentially only two steps.
  1. On the method "construct" the company produce a type PCX object.
  2. By calling the method "update" to book the order.
Of course, even more extensive or more specialized booking scenarios with the class are ready to buy "sales form letter." For example it is possible to print the same booking with these documents (once, several times and in different formats), open to the mask for the booking (for the user to influence within the company) or the booking is not directly run, but this provide for batch processing.
Thus, it is not too complex, just one more example of booking and simultaneously print the appropriate documents.
// — — Book with print 
static void PostingConfimation(Args _args) 

SalesFormLetter salesFormLetter; 
SalesTable salesTable; 
SalesId salesId; 
PrintJobSettings printJobSettings; 

salesId = "00423_036"; 
salesTable = SalesTable::find(salesId); 
salesFormLetter = SalesFormLetter::construct(DocumentStatus::Confirmation); 
salesFormLetter.update(salesTable, 
SystemDateGet(), 
SalesUpdate::All, 
AccountOrder::None, 
NoYes::No, 
NoYes::Yes); 
printJobSettings = new PrintJobSettings(salesFormLetter.printerSettingsFormletter( 
PrintSetupOriginalCopy::Original)); 
printJobSettings.setTarget(PrintMedium::File); 
printJobSettings.format(PrintFormat::PDF); 
printJobSettings.fileName(@"C:\Test_Order.pdf"); 
salesFormLetter.updatePrinterSettingsFormLetter(printJobSettings.packPrintJobSettings()); 
salesFormLetter.printJournal(); 
}
http://blogs.bojensen.eu/?p=330
Source:

Post a Ledger Journal in AX 2009 using X++


Following is the code for Posting a Ledger Journal using X++ :


static void ExampleLedgerJournal(Args _args)
{
LedgerJournalName LedgerJournalName;
LedgerJournalTable ledgerJournalTable;
LedgerJournalTrans ledgerJournalTrans;
LedgerJournalCheckPost ledgerJournalCheckPost;
NumberSeq numberseq;
LedgerJournalNameId LedgerJournalNameId = 'GenJrn';
BankAccountID BankAccountID = 'EUR OPER';
ledgerAccount offsetAccount = '601500';
amountCur amountCur = 102;
;
ttsbegin;
// Find a ledgerJournalName record
select firstonly LedgerJournalName
where LedgerJournalName.JournalName ==LedgerJournalNameId;
//Created the ledgerJournalTable
ledgerJournalTable.JournalName =LedgerJournalName.JournalName;
ledgerJournalTable.initFromLedgerJournalName();
ledgerJournalTable.Name = 'Hotel';
ledgerJournalTable.insert();
numberseq =NumberSeq::newGetVoucherFromCode(ledgerJournalName.VoucherSeries);
ledgerJournalTrans.Voucher = numberseq.voucher();
//Generate the transaction line
ledgerJournalTrans.JournalNum =ledgerJournalTable.JournalNum;
ledgerJournalTrans.CurrencyCode = 'EUR';
ledgerJournalTrans.ExchRate =Currency::exchRate(ledgerJournalTrans.CurrencyCode);
ledgerJournalTrans.AccountNum = BankAccountID;
ledgerJournalTrans.AccountType =LedgerJournalACType::Bank;
ledgerJournalTrans.AmountCurCredit = amountCur;
//Pass the Date . You can also use str2Date('08/08/2008') if period is not defined.
ledgerJournalTrans.TransDate = today();
ledgerJournalTrans.Txt = 'Room Stay';
ledgerJournalTrans.OffsetAccount = offsetAccount;
ledgerJournalTrans.OffsetAccountType =LedgerJournalACType::Ledger;
ledgerJournalTrans.insert();
info(strfmt('Journal Id:%1',ledgerJournalTable.JournalNum));
//Post the Journal
ledgerJournalCheckPost= ledgerJournalCheckPost::newLedgerJournalTable(ledgerJournalTable,NoYes::Yes));
ledgerJournalCheckPost.run();
ttscommit;
}

Wednesday, August 31, 2011

Send workflow notification as email

In AX2009, we can email the workflow notifications. The following steps will show you how to set this up:
1. Create an email template for workflow.
Go to Basic –> Setup –> Email Templates. Create a new email template for workflow notification.
image
2. Set workflow to use the template that is created from step 1.
Go to Basic –> Setup –> Settings for workflow. Select the email template on the General tab.
image
3. Enable “Send notifications as e-mail message” for the user.
Tools –> Options.
image
Source: http://fredshen.wordpress.com/

Friday, June 03, 2011

How to install and configure Microsoft Dynamics Ax 2009 workflow step by step


This article explains:
How to install Microsoft Dynamics AX 2009 Workflow step by step
How to configure Microsoft Dynamics AX 2009 Workflow step by step
How to setup Microsoft Dynamics AX 2009 Workflow step by step
About Workflow:
The Microsoft Dynamics AX workflow infrastructure enables user configurable workflows in Microsoft Dynamics AX application modules with specific focus on task and approval workflows. The workflow runtime manages configuration and executation of workflows while the application modules will manage activation and business logic associated with workflows.Microsoft Dynamics AX 2009 workflow uses Windows Workflow Foundation (.Net framework), AX batch framework, Internet Information Services (IIS), Active Directory (AD) users, .Net Business Connector for AX and web services.
Prerequisite:
You should have basic knowledge of AX.Basic AX should be installed on your system.Create two users in AD. One is for workflow another is for business connector proxy. The password should not be expired or changed for these users.If you have already created, no need to create now.Add these users to AX.
Steps to follow:
1) Open AX client then open the System service accounts form and add users for workflow.Go to Administrator > Setup > Security > System service accounts.
2) If you want to use a separate website for workflow then create a website in IIS or you can use the default website. If you use default website the setup process will create a sub site under default website.


I have created a new website called AxWfl as shown above. It’s not mandatory to create a separate website for this but recommended.

3) Run AX setup file and install workflow. If .Net Business Connector is not installed AX setup will install it itself.

4) Once the setup process is done successfully open AX client.

5) From Basic main menu create a Calendar. Here I have created the calendar called 24Hours.

6) Create a batch job for workflow. Go to the Basic > Batch job list – user form and create a batch job. Here I have created a job called Wfl.
7) Go the Administration > Setup > Workflow infrastructure configuration wizard form.Run the wizard and follow the instructions and finish it.

8) Now make a setup for Purchase Requisition. Go to Accounts Payable > Setup > Workflow configurations form. Here configure the workflow with required conditions. A Workflow Configuration is bound to a single Workflow Template. In this process you need to select the calendar you created in step 5.

Once the purchase requisition workflow setup is over go to AOT > Forms > PurchReqTable > Designs > Design. Right click on Design then properties and check whether is Workflow Enabled or not.

9) Once you have done all these then create purchase requisition using respective user, perform all the tasks you instructed during workflow configuration/setup and submit it. After submission you can see the history of workflow.


10) Now open AX client using approver user id and see the task assigned and complete it.

Using approver user id approve it and check that the purchase order has been created or not. I hope it will create a purchase order.

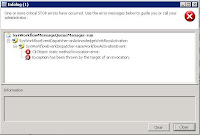
How to resolve SysWorkflowMessageQueueManager-run error in Microsoft Dynamics Ax 2009 Workflow


This article explains how to resolve SysWorkflowMessageQueueManager-run error in Microsoft Dynamics Ax 2009 Workflow.

Error:
ClrObject static method invocation error.
Exception has been thrown by the target of an invocation.
Applied on:
Ax 2009 SP1
The workaround- the above mentioned error there are few things to be checked.
1) Make sure the .NET Business Connector is connected to the correct AOS server or not.
To check this:
  • a) Start --> Administration tool --> Microsoft Dynamics AX 2009 Configuration.
  • b) On the tob change Configuration Traget to: Business Connector (non-interactive use only) on Connection tab check that it is connecting to correct AOS or not. It should be connected.
2) If you shutdown the AOS then you may need to restart the IIS to refresh the connection.
To restart it:
  • i) Start --> Run
  • ii) Type "IISRESET" without quote
  • iii) Click on OK buttonORa) Open command promptb) Type in "IISRESET" without the quote.
3) If you have more than one Workflow website setup for several environment on the same system then except one you are testing stop other websites.
4) Compare the Identity of the Application Pool used by Ax Workflow website with the Business Connector proxy setup in the system. If business connector proxy user id is not configured properly with Applicatoin pool the .NET Business Connector will fail to connect to the AOS.

How to resolve Stopped (error): Target date not found in work calendar error in Microsoft Dynamics Ax 2009 Workflow


This article explains how to resolve Stopped (error): Target date not found in work calendar error in Microsoft Dynamics Ax 2009 Workflow.

Symptom:
If you see the Tracking details of your workflow process it shows "Workflow stopped (error)" and : Stopped (error): Target date not found in work calendar.

Reason:
A work calendar is missing in workflow setup.

Resolution:
The workaround on this, create a work calendar in Ax.
To do this:
Go to Basic-->Calender and create a calender. If you have already created a calender you can use that one.

Once the Calender is created, assign the calendar to the workflow setup. Lets say you are running workflow for Purchase Requisition then Go to the Accounts Payble-->Setup-->Workflow Configuration. On this form go to Details tab, select a Workflow element, in the buttom part (Approval Details) select Overview tab, check the check box "Set a time limit for the approval process". Here you will get the calender lookup to select a work calender. Assign a calender and do any other setup if you require. Save your work and make transaction for workflow to check.

I hope this will remove your 
Stopped (error): Target date not found in work calendar error.

How to resolve Ax 2009 SRS reports deployment error or exception

This article explains how to remove 
  • While deploying AX SRS reports from AX client (AOT->Report Libraries), system gives below error / exception
  • While deploying AX Reports Deployment tools , system gives below error / exception
Symptom:
In case of SQL Server 2008
One or more libraries built with warnings. Please see MSBuild log at C:\Documents and Settings\Administrator\Local Settings\Temp\tmp.tmp
Deploying 0 data source(s) and 63 design(s) in 42 culture(s) (2521 item(s) total)...
Unable to connect to http : // [your system name]/ReportServer/ReportService2005.asmx as specified in the config file for the report server at C:\Program Files\Microsoft SQL Server\MSRS10.MSSQLSERVER\Reporting Services\ReportServer\RSReportServer.config. If this url is not correct please update the config file, otherwise make sure the report server is configured correctly. The deployment log file can be found at "C:\Users\Administrator\AppData\Local\Temp\1\tmp.txt"


In case of SQL Server 2005
One or more libraries built with warnings. Please see MSBuild log at C:\Documents and Settings\Administrator\Local Settings\Temp\tmp.tmp
Deploying 0 data source(s) and 63 design(s) in 42 culture(s) (2521 item(s) total)...
Unable to connect to http : // [your system name]/ReportServer/ReportService2005.asmx as specified in the 
config file for the report server at C:\Program Files\Microsoft SQL Server\ MSSQL.3\Reporting Services\ReportServer\RSReportServer.config. If this url is not correct please update the config file, otherwise make sure the report server is configured correctly.
The deployment log file can be found at "C:\Users\Administrator\AppData\Local\Temp\1\tmp.txt"


Resolution:
Check following:
1) Is your report manager working from IIS or Internet explorer? If no then make it workable. If it works then you can see Report Manager Home.
2) Is web service http : // [your system name]/ReportServer/ReportService2005.asmx working?

To make the default Report Manager workable, you can see the installation and configuration guidance.

If you are using SQL server 2008, open the C:\Program Files\Microsoft SQL Server\MSRS10.MSSQLSERVER\Reporting Services\ReportServer\RSReportServer.config file in an editor (Notepad is perfect).

If you are using SQL server 2005, open the C:\Program Files\Microsoft SQL Server\MSSQL.3\Reporting Services\ReportServer\ rsreportserver.config file in an editor (Notepad is perfect).

Now you have to modify this config file. Before you do this I do recommend you to make a copy of this file as a backup.Press Ctrl + F and find ‘SQLCommandTimeoutSeconds’. By default the value is 60. Increate the value upto 300 and save the file.

Now restart the IIS.
Launch AX SRS report deployment tool. I hope it will work.

Once the AX SRS Reports deployment is finished go back to the above mentioned config file and decrease the value 60 from 300. 

Cheers!

Resolution for Microsoft Dynamics Ax 2009 Role Center & Enterprise Portal (EP) Access Denied error

This article explains:
How to resolve Microsoft Dynamics Ax 2009 Role Center & Enterprise Portal (EP) Access Denied error.
How to assign permission to Microsoft Dynamics Ax 2009 Role Center & Enterprise Portal (EP) users.
How to give permission for Microsoft Dynamics Ax 2009 Role Center & Enterprise Portal (EP) users from Microsoft Windows Sharepoint Services or Server.


Problem:
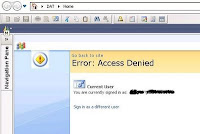
When you open Microsoft Dynamics Ax 2009, the role center shows an error “Error: Access Denied” + “Current User” + “You are currently signed in as: domain name\user id” + “Sign in as a different user”.

Reason:
You don’t have the permission to access AX enterprise portal (website) which is made within windows sharepoint services or server.

Resolution:
The permission to be given to all the users who wants to access Role Center or Enterprise portal.

1) 
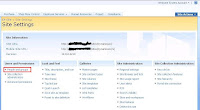
To give the permission you have to login to the Ax enterprise portal (website) using administrator permission.On the Ax enterprise portal site there would be a button called “Site Actions” on upper right hand side. Click on Site Actions then Site Settings as shown below.


2)
Click on People and groups under Users and Permissions


3)
Click on New then Add Users.


4)
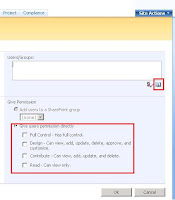
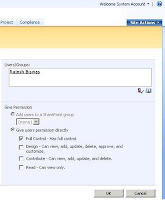
Add user(s) from domain you are using for AX and WSS. Once the user(s) is added, give permission accordingly as shown below.


5)
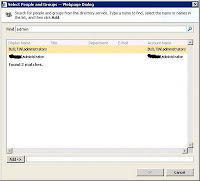
From below screen you can search user(s) and add them.


6)
Once the user(s) added and permission assigned, click on OK button.
Now you have given the permission to the user(s). It should not give you any error like Access Denied.

Use Chain Of Command with Examples

 Dear Friends Here is an example of using Chain of Command for form datasource methods. [ExtensionOf(formDataSourceStr(<<Form Name>...