his article explains how to develop or customize Microsoft Dynamics Ax 2009 Enterprise Portal using User Control. How to use Visual Studio (.Net) environment to develop/customize Microsoft Dynamics Ax 2009 Enterprise Portal. How to use Microsoft Dynamics Ax 2009 Data Sets within .Net environment. How to develop or customize Dynamics Ax 2009 Enterprise Portal.
To follow this article you should have installed:
1. Open Microsoft Dynamics Ax 2009 application then AOT. Select Data Sets node, right click on it, and select New Data Set.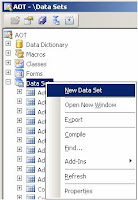
2. Rename it to SalesInfo (or any other name whatever you wish) as shown below:
3. Add SalesTable and CustTable to the Data Sources of SalesInfo Data Set as shown below. Make a join between these table.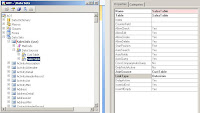
4. Now open your Visual Studio, click on File->New->Web Site… as shown below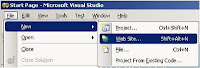
5. From web site template select Dynamics Ax Web Project template, Location should be File System, Language should be Visual C#, and .Net Framework 2.0 as shown below. Click on OK.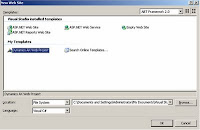
6. Now see the Solution window where a project has been created in the name “AxWebProject1”. You can rename it.
7. Right click on AxWebUserControl.ascx page in the solution window then click on View Designer as shown above.
8. Now open the Toolbox and find Dynamics Ax tool section. Drag and drop AxDataSource control from Toolbox to the body of theAxWebUserControl.ascx page.
9. Select the AxDataSource1 on the AxWebUserControl.ascx page then assign a DataSet to it from the AxDataSource Tasks dropdown as shown below. Here you need to select SalesInfo DataSet you created in step1.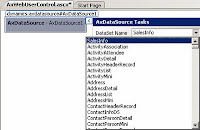
10. Go to the Toolbox again and add AxGridView control from Toolbox to the AxWebUserControl.ascx form as shown below.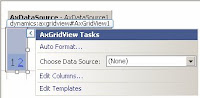
11.Add AxDataSource1 to AxGridView.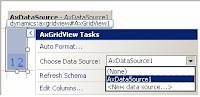
12.Now click on Edit Columns… on AxGridView Tasks.

You will get the below field designer.

13. Add those fields you want to display. I added AccountNum, Name, CustGroup and SalesTable!Status. Later on I modified the fields.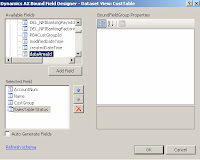
14. Now select the AxWebPartPage.aspx in the solution window. Right click on it. Select View Designer.

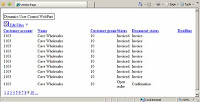
15. Now drag the AxWebUserControl.ascx page from solution window and drop it to the body of the AxWebPartPage.aspx. Press F5 to execute the page. See the data is being displayed from Ax in the internet explorer.
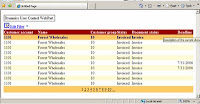
Grid format(Template) is also available. See step 12. Auto Format is there.
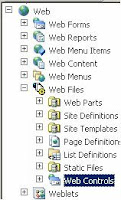
Now your newly created user control is available in Microsoft Dynamics Ax 2009 AOT. To check go to AOT->Web->Web Files->Web Controls->User Controls.
If it's not available in the AOT then you can add it to AOT.
Right click on .ascx control in the Sulution explorer then click on Add to AOT as shown below
Hope this will be helpful for you.
To follow this article you should have installed:
- Microsoft Dynamics Ax 2009 with Enterprise Portal
- Enterprise Portal should be configured with Microsoft Windows Sharepoint Services 3.0 SP1 or Microsoft Windows Sharepoint Server 2007 SP1. A website for Enterprise Portal should be created
- Visual Studio 2008.
- X++ Language
- Microsoft Dynamics Ax 2009 customization
- .Net development
- Microsoft Windows Sharepoint Services product
1. Open Microsoft Dynamics Ax 2009 application then AOT. Select Data Sets node, right click on it, and select New Data Set.

2. Rename it to SalesInfo (or any other name whatever you wish) as shown below:

3. Add SalesTable and CustTable to the Data Sources of SalesInfo Data Set as shown below. Make a join between these table.

4. Now open your Visual Studio, click on File->New->Web Site… as shown below

5. From web site template select Dynamics Ax Web Project template, Location should be File System, Language should be Visual C#, and .Net Framework 2.0 as shown below. Click on OK.

6. Now see the Solution window where a project has been created in the name “AxWebProject1”. You can rename it.

7. Right click on AxWebUserControl.ascx page in the solution window then click on View Designer as shown above.
8. Now open the Toolbox and find Dynamics Ax tool section. Drag and drop AxDataSource control from Toolbox to the body of theAxWebUserControl.ascx page.

9. Select the AxDataSource1 on the AxWebUserControl.ascx page then assign a DataSet to it from the AxDataSource Tasks dropdown as shown below. Here you need to select SalesInfo DataSet you created in step1.

10. Go to the Toolbox again and add AxGridView control from Toolbox to the AxWebUserControl.ascx form as shown below.

11.Add AxDataSource1 to AxGridView.

12.Now click on Edit Columns… on AxGridView Tasks.

You will get the below field designer.

13. Add those fields you want to display. I added AccountNum, Name, CustGroup and SalesTable!Status. Later on I modified the fields.

14. Now select the AxWebPartPage.aspx in the solution window. Right click on it. Select View Designer.

15. Now drag the AxWebUserControl.ascx page from solution window and drop it to the body of the AxWebPartPage.aspx. Press F5 to execute the page. See the data is being displayed from Ax in the internet explorer.

Grid format(Template) is also available. See step 12. Auto Format is there.

Now your newly created user control is available in Microsoft Dynamics Ax 2009 AOT. To check go to AOT->Web->Web Files->Web Controls->User Controls.

If it's not available in the AOT then you can add it to AOT.
Right click on .ascx control in the Sulution explorer then click on Add to AOT as shown below

Hope this will be helpful for you.


No comments:
Post a Comment