Tuesday, September 08, 2015

How to implement basic authentication with AIF services in Dynamics AX 2012

Disclaimer:  This sample is not a production ready solution.  As described below the user credentials will be passed in plain text which is not ideal in a production environment.  To prevent this from occurring it would be recommended to incorporate SSL with this solution.

1.     Create inbound HTTP port.
a.     Navigate to System administration->Setup->Services and Application Integration Framework->Inbound ports.
b.     Create an inbound port using the HTTP adapter with settings similar to the image below.
Basic settings:


Service operations:

1.     Activate the new inbound port.
2.     We need to configure the client configuration.  In order to do this you need to select the ‘Configure’ button. Note:  Do not select the ‘Configure AOS’ button.
3.     You should see a dialog with a warning.  Just click yes to continue loading the configuration file.
4.     Locate the Bindings section under the Configuration frame and select ‘New Binding Configuration’ from the Bindings frame.
5.     Select ‘basicHttpBinding’ and click OK.
6.     In the ‘Name’ field enter ‘basicHttpBindingWithBasicAuth’.


1.     Click the ‘Security’ tab and set the attributes as shown below.


1.     Locate the ‘reqReplyEndpoint’ in the Configuration frame, and highlight it.
2.     Change the BindingConfiguration attribute for the endpoint from ‘basicHttpBindingWithWindowsAuth’ to ‘basicHttpBindingWithBasicAuth’.


1.     Save the configuration file and close the WCF configuration editor.
2.     Activate the SalesOrderHTTPService port.
3.     Open IIS manager and navigate to the MicrosoftDynamicsAXAif60 virtual directory.  Highlight it, and from the main frame open ‘Authentication’ from the IIS group.
4.     Enable Basic Authentication.  Your settings should look like that below.


1.     Close IIS manager and complete an iisreset from a command prompt.
2.     Open Visual Studio.
3.     Select File->New->Project.  From the New Project dialog select Windows Forms Application.  Enter a name for the project (e.g. SalesOrderTest).  Click OK.


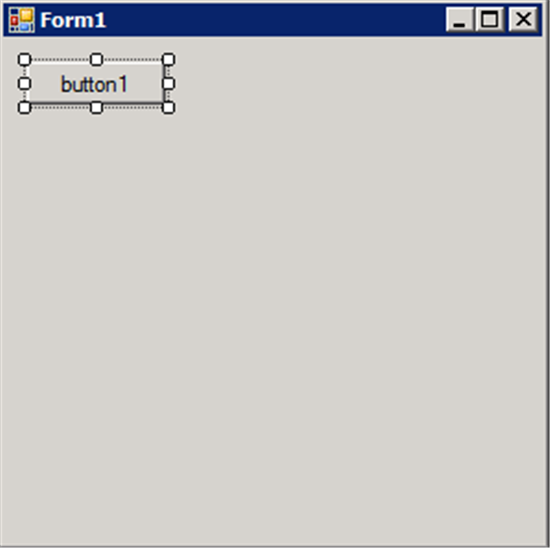
1.     Once the project opens drag a button from the toolbox onto the form.


1.     Add the Sales Order Service reference to the project.  Note:  You can pull the address from the ‘Inbound ports’ form within Dynamics Ax. 
Important:  You will be asked for credentials in order to access the service and metadata.  I entered my administrator account and password until the RoutingService showed in the Services frame below, then cancelled all remaining authentication dialogs.  This will only work if you have Windows and Basic authentication enabled on your IIS box for the AIF virtual directory.


1.     Close IIS manager.  Open a command prompt and complete an iisreset.
2.     Open Visual Studio and open your project back up.
3.     Double-click the Button on the form to open the code window and create a new button_click event.
4.     Add a ‘using’ statement for the sales order web service. 

1.     Within the newly created button click event paste the following code.
            SalesOrderServiceClient proxy = new SalesOrderServiceClient();
            proxy.ChannelFactory.Credentials.UserName.UserName = @"domain\user";
            proxy.ChannelFactory.Credentials.UserName.Password = @"password";

            CallContext context = new CallContext();
            context.Company = "ceu";

            AxdSalesOrder salesOrder = new AxdSalesOrder();
            AxdEntity_SalesTable[] salesTables = new AxdEntity_SalesTable[1];
            AxdEntity_SalesTable salesTable = new AxdEntity_SalesTable();
  
            salesTable.CurrencyCode = "USD";
            salesTable.CustAccount = "1103";
            salesTable.ReceiptDateRequested = Convert.ToDateTime("2/1/2012");
            salesTable.Payment = "N060";
            salesTable.PurchOrderFormNum = "PO113";


            #region Financial Dimensions
  
            AxdType_DimensionAttributeValue dimBusinessUnit = new AxdType_DimensionAttributeValue();
            dimBusinessUnit.Name = "BusinessUnit";
            dimBusinessUnit.Value = "20";


            AxdType_DimensionAttributeValue dimCustomerGroup = new AxdType_DimensionAttributeValue();
            dimCustomerGroup.Name = "CustomerGroup";
            dimCustomerGroup.Value = "10";


            AxdType_DimensionAttributeValue dimDepartment = new AxdType_DimensionAttributeValue();
            dimDepartment.Name = "Department";
            dimDepartment.Value = "500";
  
            AxdType_DimensionAttributeValueSet valueSet = new AxdType_DimensionAttributeValueSet();
             valueSet.Values = new AxdType_DimensionAttributeValue[3] { dimBusinessUnit, dimCustomerGroup, dimDepartment };
            salesTable.DefaultDimension = valueSet;
             #endregion
  
            AxdEntity_SalesLine salesLine = new AxdEntity_SalesLine();
             salesLine.ItemId = "1000";
            salesLine.SalesQty = 1;
            salesLine.SalesUnit = "ea";


            AxdEntity_SalesLine salesLine2 = new AxdEntity_SalesLine();
             salesLine2.ItemId = "1000";
            salesLine2.SalesQty = 55;
            salesLine2.SalesUnit = "ea";

             AxdEntity_SalesLine salesLine3 = new AxdEntity_SalesLine();
            salesLine3.ItemId = "10004";
            salesLine3.SalesQty = 21;
            salesLine3.SalesUnit = "Pcs";
  
            AxdEntity_InventDim inventDim = new AxdEntity_InventDim();
            inventDim.InventSiteId = "1";
            salesLine3.InventDim = new AxdEntity_InventDim[1] { inventDim };

             salesTable.SalesLine = new AxdEntity_SalesLine[3] { salesLine, salesLine2, salesLine3 };
            salesOrder.SalesTable = new AxdEntity_SalesTable[1] { salesTable };

             try
            {
                 proxy.create(context, salesOrder);
                MessageBox.Show("Worked");
            }
  
            catch (Exception ex)
            {
                 throw ex;
            }

1.     Open IIS manager and navigate to the MicrosoftDynamicsAXAif60 virtual directory.  Highlight it, and from the main frame open ‘Authentication’ from the IIS group.
2.     Disable Windows Authentication.  Your settings should look like that below.


1.     Close IIS manager and complete an iisreset from a command prompt.
2.     Build and test the program.
Note:  The data presented in the sample above may not coincide with your existing database.  You may have to update the code to validate against your AX setup.  If you do not update the sample code you are likely to get a validation error returned from the server.

Happy DAXing.. :)

Source : MSDN Blog

Monday, August 10, 2015

Integration Technologies for Dynamics AX 2012

As enterprises move towards using more and more specialized applications rather than having ERP do everything for them, you need a robust framework & strategy for managing integrations within the ERP system. Dynamics AX provides many such robust frameworks and functionalities to integrate with third party applications using modern techniques

The following section outlines the commonly used integration technologies in Dynamics AX.  It is important to make sure the technical analysts and developers on your project are familiar with these technologies so that they can support the design process and identify the best integration solution for your project

The following table compares integration technologies to help you determine the suitable integration tool as per your requirement.
Pros
Cons
Good for 
Examples 
AIF 
·       Robust framework
·       Out of the box  services
·       Administration and monitoring
·       Scalable
·       Secure

Framework overhead
·       Document based exchanges
·       Transaction processing across system
 Create/update Sales orders
Create customers
Send Product details
Send Price details
Send AP payment data
DIXF
Robust framework
Future async integration methodology for dynamics AX
Need extension to automate and administer the process

High volume integrations
Master data synchronization
GL Integration
Expense report import
Master data sync
.NET Framework
Utilize power of .NET programing languages

Add on solutions
Integration with .NET apps
Transformation components
Integrating with specialized SDK such as OCR*
Business Connector
Expose dynamics AX business logic
Utilize AX security framework
Phasing out
Uses TCP communication protocol
Application extension
Application for handheld devices
Third party Integration Solution
Specialized end to end solution
Special scenario only
Specialized third party applications
Sales tax
AP automation
EDI Integration
Banking
Credit Card


Happy DAxing.... :)

Friday, July 24, 2015

How to Modify Tools Menu?


Hello Friends,

Today, I will demonstrate how system menus can be modified. I will add a link to the Online users form in the DevelopmentTools menu.

Please carry out the following steps in order to complete this recipe:

1.      In the AOT, locate the DevelopmentTools menu.
2.      Add a new separator to the top of the menu.
3.      Add a new menu item to the top of the same menu, with the following properties:
Property
Value
MenuItemType
Display
MenuItemName
SysUsersOnline

4.      The DevelopmentTools menu should look as in the following screenshot:


5.      To test the menu, restart the client, and note the newly added Online users option under the Tools menu in the Development workspace window:


Happy DAXing…. J

Thursday, November 06, 2014

How to Flush the AOS cache without restarting AOS service

Scenario: Some times, Your customization does not reflect in to AX objects. we needed to flush the cache to make sure that customization will take place, but we could not stop and start the AOS. 
The only way I have ever known to flush the AOS is to stop and start it. Well i got to know a nice little trick recently. You may or may not be aware of three menu action items that can be used to flush system data, the AOD, and dictionary. The thing about these though is that they are set to run at "called from" which when ran clear the client cache. 
SolutionWell the trick is to copy these three menu items, and then change the run from property to server. Now you can launch these menu items, and they will run on the server, therefore clearing the AOD, sys data, and dictionary, causing a refresh. 
So the three menu items that you copy (don't change the real deals) are:
[Under Menu items > Action]

1. SysFlushAOD
2. SysFlushData
3. SysFlushDictionary

Happy DAXing....... :)

Wednesday, November 05, 2014

How to write X++ methods on the list page Form in Dynamics AX 2012

Scenario: I have a menu item that calls some class to execute business logic on the list page Form. List pages do not allow writing of code on the Form, as they used interaction class.
Solution: You can write the code on list page buttons by setting DisplayTarget property to “Client” from auto. 
Note: After this change, you won’t be able to use this button on the EP, so if you are thinking of using the same list page on the EP and planning to use the same button there, then do not do it. However if you are using only the Rich client Form then you are good to do this.
Happy DAXing..... :)

Thursday, September 04, 2014

System does not support setup 'continuous' of number sequence XXX.

Hi,

Recently i faced this issue related number sequence. I Realized, the issue was that the getNewNum function was called without transaction processing. Please encapsulate your code with in transaction and it will work fine.......... :)

ttsbegin;

[Your Code]

ttscommit;

Happy DAXing......... :)

Monday, August 04, 2014

Maps in AOT (Microsoft Dynamics AX 2012)

Microsoft Dynamics AX 2012 :Maps in AOT

Maps are nothing just an element/object the makes possible to link/associate map fields with fields(same type with different names) in different tables like, I have create a MAP with field (AccountNum) and Same field exist in CustTable and also in VendTable,so I can associate field in CustTable and in VendTable with Maps, so basically  Maps enables to access the fields with different name in different tables.

EXAMPLE:
I have created a Map by navigating to AOT>Data Dictionary>Maps and right click and new and gave it name ‘MapTest’


I have created 4 fields in under Fields node in Map (drag and drop from EDT)


Now the next thing I need to do is to associate the fields in map with the fields in different tables, let say I am taking two tables (CustTable and VendTable).


Notice that above, four fields that I have created in Maps also exist in CustTable as well as VendTable with different names.
To associate fields, go to Mapping node, right click it and click New mapping, and enter the table that you want to associate in Mapping Table field. Like


And the associate fields with fields in MAP


Now I have created a method called printInfo under method node in Maps, which print the value of the map field AccNumber.

public void printInfo()
{
info(strFmt(“Map : AccountNum :%1″,this.AccNumber));
}

Similiarly I have create same methods under method nodes of CustTable and VendTable which are printing their respective AccountNumber fields


Now finally I have created a job see below I  am not describing every line as I have added comments above the line.


When I run this job see what happens


Happy DAXing......... :)


How to stop updating existing records while importing Data through Data Management Framework (DMF)

Problem Statement : I was working on a requirement involving file-based integration using the Data Management Framework (DMF). The data ent...